
How to install Hexayurt Original?
Step #1 Instructions:
Place your tarp in your preferred position.
The tarp is 16ftx16ft. You can place your six anchor spikes in half way (straight in) to make sure tarp does not move as you can see in video #4.
Take the 2 roof pieces and place them off the tarp area
- Take the 2 roof pieces (they have 90 degree angles and are 2 halves that make a rectangle) and place them off the tarp area. Note: Place something with weight on top of them if there is wind so that they do not move.
Take your yurt and stand it up
Take your yurt and stand it up so that the foil ends face down (1 long angle has foil and the other does not). You can now open it accordingly per the video. The logo's will be facing the inside. If the angles do not want to open you are opening it the wrong way. It will be a smooth and easy process.
Open your yurt into the general shape of a hexagon.
Open your yurt into the general shape of a hexagon. The front and back angles will be parallel and same with the left to the back right and right to the back left as you see in the video.
Important Reminder
If you are installing in conditions that have any wind, Step 2 will come before Step 1
Watch Step 2
Step #2 Instructions:
Open your roof pieces
- Open your roof pieces (2) so that the logo is facing down. Bring them together so they almost complete a full piece
Seal it down
- Place a support over the 2 pieces brought together and seal it down (place 2 supports).
Tape all the way down
- Run a piece of tape all the way down that seam. Note: Make sure you do not place the tape over the other angles (overlap). This will disallow the angles to move when completing the roof. You can cut the tape accordingly.
Fold one of the roof pieces over
- Go to the other side (the side with the gap still) and fold one of the roof pieces over like you see in the video (it will just flap right over). This allows you to step right up to the center. Grab the center of the roof and pull it up. When you pull it up you will see the angles come together.
Pull the seams together for the taping process
- Have one of your team members get inside (it is insulated so it will not be that hot). Having them inside will allow them to pull the seams together for the taping process. They can also hold the seams so that when the tape is being laid and pressed down they can assist in applying pressure so that it does not move as they complete this process.
Lay your support pieces
- Fold the roof piece back over and you will see the seam match up. Adjust accordingly so that they are right next to each other to be able to be taped.
- Lay your support pieces. This will also make sure the panels do not move when you are placing the final tape piece down.
Tape all the way over to the other side of the roof.
- Grab a team mate and have them run a piece of tape all the way over to the other side of the roof. You will be taping the seam you just laid support pieces over as well as an additional piece over the prior taped angle you did at the beginning of this step.
- Seal down the tape with your tape stick. Your team mate inside can help hold it while you place some pressure on sealing the tape down.
- This is all for step #2. Do not forget to let your team mate out from inside!
Watch Step 3
Step #3 Instructions:
Take the rope and place it over the roof
- Take the rope that is in your little bag and place it over the roof. It will not fall off and is easy to place over it.
Place the roof over the base
- Grab 4 team mates total and place the roof over the base (if you have more then perfect it will make it easier). This is when you are able to line up the base angles perfectly for the hexagon because the roof is already angled correctly. Make adjustments accordingly so that the roof is set in the middle of the base panel (the foam is touching the foam and resting on the base).
Seal it down
- Go around and place 6 supports as seen in the video. This will allow the roof to be secure to the base. Make sure your team mates hold the yurt if there is wind.
- Run a tape line all the way around your Hexayurt. When you get to the corners make a small slit as seen in the video so that the tape does not crumple over itself.
- Seal all of the tape down.
Watch Step 4
Step #4 Instructions:
Attach your bungees at the 6 angles of the yurt
- Grab your bungees and nail spikes (if your nail spikes are not already in the ground holding the tarp). Note: 8' units have 6 nail spikes and 6 bungees. 10' units have 12 nail spikes and 24 bungees. There are 12 bungees that are 4ft long and 12 that are connectors to them that are 2ft long.
- Attach your bungees at the 6 angles of the yurt (double up if you are using a 10' unit).
Slide metal pieces on all of your nail spikes
- Take your little oval metal pieces and slide them on all of your nail spikes (you will have 6 for the 8' units and 12 for the 10' units). This is what the bungee system will be attaching to.
Hammer in
- Hammer in your nail spikes if you have not done so already. Note: Nail them straight down and all the way in. Straight down! (Video says otherwise but based on new research go straight down).
- At this point you can either choose to tape your tarp to the bottom of the yurt for extra dust prevention or leave it flat. Your choice.
- Take your bungee system and pull it to your nail spikes attaching it to the oval metal pieces. Go under and up is the easiest way. They fasten right to it.
Tighten it
- Once you have attached all of them you need to start going to each one with a team mate or 2 and pull all of the slack out of the bungee and tighten it. Just pull straight up and it will tighten and down to secure it. Make sure you secure it aggressively and check them throughout your adventure.
Step #5 Instructions:
Take a piece of your tape and place it on the front of the door
- Take your 2 little bright blue looking gadgets. These are door locks. Take a piece of your tape and place it on the front of the door in the middle (this is where the sticky part of the lock will go on and allows you not to rip the foil layer on the Hexayurt). Then take the sticky side off the back and press it on. It will go over the gap of the door where it opens. This keep your door closed and locked from the wind trying to open it. It is a simple device we are trying out this year so let us know what you think about it. Picture below.
- Do the same step on the inside!
Thank your teammates and go have fun!
Thank your teammates and go have fun! Do not forget to check continuously that your Hexayurt is secure to the ground.
More about the AC and Generator: The generator is very simple and comes with a manual. If it shuts down randomly most of the time it is due to not having enough oil (extra oil has been provided to you).
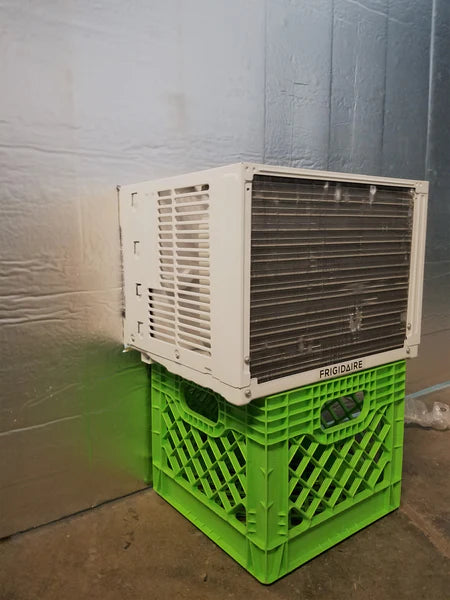
The air conditioners provided have filters that you should clean out consistently.
The AC sits directly on the crate provided to you and slides into the pre-cut hole. You have foam (black) insulation that you can place on the front of the AC for when you slide it into the pre-cut hole to create a better seal. The AC will only slide into the hole a few inches.
Note: You can tape around the ac once it is in place to create a dust seal.
Taking apart the yurt:
DO NOT TEAR OR PULL THE TAPE OFF!
With taking apart it is a very simple process. DO NOT TEAR OR PULL THE TAPE OFF! Just cut the tape accordingly as you had placed it on. You need to make sure and cut the tape over the angles that you overlapped (if you go to fold it back up and it does not want to then there is tape that is overlapped that needs to be cut). It should go smooth and simple.
All the tape that was already on the Hexayurt when you opened it for the first time should not be cut or even touched in the disassemble process. Each year you can use your yurt over and over you just need to re-tape it.